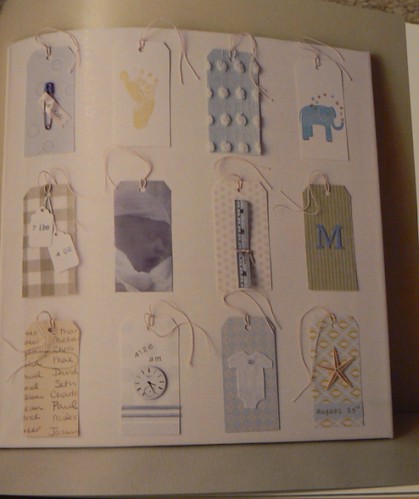
I am still hard at work on my
baby book. Two of the pages will feature a tag college, which was meant to be a separate project as per Suzanne Stirling, but like I said, I'm running out of wall/display space. I like a lot of ideas featured in B is for Baby (see picture to the right), but need more. I have some old appointment slips but am trying to think of more ideas. Suggestions welcome! I made the tags below by taking leftover business cards from my wedding guestbook and experimenting with tag shapes until I made one I was happy with. I used the template on the cardstock I've been using throughout the baby book. I then punched a hole in the top of each and placed a hole reinforcer around the holes. I looped a piece of red thread through the holes and made a few extras in case I mess up (which I will). I really mean it about the suggestions...I have 24 tags to fill.
Showing posts with label Baby Room. Show all posts
Sunday, October 16, 2011
Decal Dilemma
We aren't positive what we're painting the nursery yet, so I stuck with a white background. I did a custom order from Dali, which was super easy and relatively quick to arrive. All three of the athletes below are part of a series. And obviously, I used colors that will coordinate with all my nursery stuff. What's the dilemma? I've made and purchased so many things for the walls in my tiny nursery, I'm not going to have room for it all!
Labels:
Baby Room,
On the Walls
Wednesday, October 12, 2011
The Best Baby Mobile Ever
I am obsessed with the baby mobile I made. It may not be built to last, made of paper and all, but it sure is pretty. I was inspired by this hot air balloon mobile. Arriving at the final product took a lot of trial and error, as I'll discuss below, but it was all worth it. Instructions below:
You'll need:
Circle cutter - I used this one from Martha Stewart
Spray adhesive
Regular glue stick
Self-healing cutting mat
Silver, red, and white paint pens or markers
Black pen
Xacto knife
bone folder
3.5 inch circle punch
White tape or mailing labels
2 sheets of 12x12 orange bumpy paper - you can find all the paper below at Michael's
6 sheets of 12x12 plain white paper
2 sheets of 12x12 lime green bumpy paper
1 sheet of 12x12 plain black paper
1 sheet of 12x12 vinyl black paper
Red spool of thread
Tape runner and a few refills
Huge quilting loop. Embroidery loop will do if you like
Red velcro ties from any hardware store
Three 2' long white chain - you can get this cut from Home Depot
One 6' long white chain (or whatever, depending on how tall your ceiling is)
One chain link
One hanging mounting kit, like for a plant
Sports balls
Make four 2-D versions of each ball. To make the mobile more sturdy, double the paper up.
Basketball
- Use spray adhesive to glue the backs of the orange bumpy paper.
- Use circle cutter to create four 5.5'' circles.
- Use the background of the circles to create the lines on the basketballs using a black paint pen, as shown here, and set aside to dry. Vary the pattern on all four balls.
- Use spray adhesive to glue the backs of 2 sheets of the smooth white paper.
- Use circle cutter to create 4.5'' circles.
- Use the background of the circles to create the lines on the baseballs in red. Make little v's along the lines to look like stitches. Vary the pattern on all four balls.
- Use spray adhesive to glue the backs of the bumpy lime green paper.
- Use circle cutter to create 4'' circles.
- Use the background of the circles to create the lines. on the tennis balls in silver. Vary the pattern on all four balls.
- Use spray adhesive to glue the backs of two sheets of the smooth white paper.
- Use the 3.5'' punch to create circles.
- Use the silver paint pen to make little dots on all four balls. Start with a line of dots in a smooth curve and fill in the lines above and below in between dots. Set aside to dry.
- This one is a little complicated and will take trial and error on your part. Because you're using vinyl, you don't have to double up.
- Make one four inch circle out of scrap paper.
- Then, using the 7'' setting on your circle cutter, swoop over the bottom of the circle to create a puck shape.
- Use the background of the large circle to create the 3D effect using the silver marker. You may need to make more than one "trial run" puck. Note all your measurements.
- Once you're done, make four pucks total.
- Use spray adhesive to glue the backs of the bumpy brown paper.
- Make a template of a football, freehand, on cardboard. I made my husband do this.
- Cut the template out using the xacto knife.
- Use the xacto to make four footballs out of the brown bumpy paper.
- Use the tape or labels to make a pattern of the grips on the football. Vary the pattern on the four balls.

- Use spray adhesive to glue two remaining white sheets of paper together.
- Using the 5.5'' setting on your paper cutter, cut four circles out.
- Also cut four 5.5'' circle out of plain black paper.
- Cut a total of five isosceles triangles out of the edge of each of the black circles. Cut a pentagon out of the middle of the circle. Feel free to mess up here - you should have plenty of black paper. You'll end up with twenty little black triangles and four pentagons.
- Using a glue stick, glue a pentagon to the middle of each circle. Glue a triangle to adjacent to each pentagon point at the edge of the circle.
- Use a black pen and a ruler to connect the point to the top of each triangle.
The main trial and error occurred here. At first, I tried hanging the balls from dowels, but the balancing thing got to be too difficult. For each ball:
- Use a bone folder to fold
every ball in half, evenly.
- Measure 8 pieces of thread the same length. I did an arms length every time - you don't have to be exact. You are going to trim, anyway.
- Along the side of every fold, tape a piece of thread to the top of the ball. So, each ball will have two pieces of thread coming off it.
- Use the tape runner to affix one half of one ball to another half of the ball, creating a 3-D effect.
- Paint the embroidery loop whatever colors you want. Let it dry overnight.
- Neatly wrap the 8 threads from each ball around the inner loop. You can hang all the balls at the same height or vary, like I did.
- Place the outer loop around and tighten. Using so many threads will allow the balls to spin!
- In a triangle formation, wrap the velcro ties around the embroidery hoop and through a length on each of the three 2' chains. Adjust each arm around the loop for balance.
- Use the chain length to attach the other side of the chains to the long chain
- Mount the plant hook from the ceiling
- Voila - done!
Labels:
Baby Room
Friday, October 7, 2011
My Baby's Blanket
My baby's beautiful blanket is DONE! Ends woven in and everything! I am so proud. I think it came out beautifully. The pattern follows the pictures below:
I did not come up with this pattern on my own. I found something similar on Ravelry as an afghan worked in five panels and I just modified it by adding a border and making it one continuous piece. Please tell me if there are flaws in the pattern if you choose to make it yourself. Sorry I'm so verbose.
I incorporated the border into the pattern because I've added borders in the very end before and ended up with a weird puckering problem. So, in the pattern that follows, your first four and last four stitches of every row will be in white.
CO 149 stitches in white
Row 1: knit
Row 2: knit
Row 3: purl
Row 4: K2 *k2 yo K4 K2tog K2tog K4 yo K1 yo K4 k2tog k2tog k4 yo k2* x5 K2
Row 5: knit first four stitches in white, continue in blue without cutting white yarn. You will draw this piece of yarn up with you every time you come across it. This way, you end up finishing (sewing) up a lot less in the end. When you get to the end of the row, using a separate skein of white yarn, knit the last four stitches.
Row 6: K2 in white, P2 in white, P2 the rest in blue until the last four stitches, P2 in white, K2 in white
Row 7:K2 in white, K2 in blue *k2 yo K4 K2tog K2tog K4 yo K1 yo K4 k2tog k2tog k4 yo k2 in blue* x5 K2 in white (also knit the last 2 of sequence in white, so your last four stitches are white) From this point on, I'm not going to go into detail as above, but follow the same principles with the border. When I say "in [color]," I'm referring to the body of the blanket and am assuming you're knit the first and last four in white.
Using the existing white skein on the side you are on:
Row 8: knit
Row 9: knit
Row 10: purl
Row 11: In white, K2 *k2 yo K4 K2tog K2tog K4 yo K1 yo K4 k2tog k2tog k4 yo k2* x5 K2
Yellow:
Row 12: knit
Row 13: purl
Row 14: K2 *k2 yo K4 K2tog K2tog K4 yo K1 yo K4 k2tog k2tog k4 yo k2* x5 K2
White:
Row 15: knit
Row 16: knit
Row 17: purl
Row 18: K2 *k2 yo K4 K2tog K2tog K4 yo K1 yo K4 k2tog k2tog k4 yo k2* x5 K2
Red:
Row 19: knit
Row 20: purl Row 21: K2 *k2 yo K4 K2tog K2tog K4 yo K1 yo K4 k2tog k2tog k4 yo k2* x5 K2
Repeat four times or to desired length.
To end-
White:
knit row
knit row
purl row K2 *k2 yo K4 K2tog K2tog K4 yo K1 yo K4 k2tog k2tog k4 yo k2* x5 K2
Blue:
knit row
purl row
K2 *k2 yo K4 K2tog K2tog K4 yo K1 yo K4 k2tog k2tog k4 yo k2* x5 K2
White:
knit row
knit row
purl row
K2 *k2 yo K4 K2tog K2tog K4 yo K1 yo K4 k2tog k2tog k4 yo k2* x5 K2
Knit row
BO
I did not come up with this pattern on my own. I found something similar on Ravelry as an afghan worked in five panels and I just modified it by adding a border and making it one continuous piece. Please tell me if there are flaws in the pattern if you choose to make it yourself. Sorry I'm so verbose.
I incorporated the border into the pattern because I've added borders in the very end before and ended up with a weird puckering problem. So, in the pattern that follows, your first four and last four stitches of every row will be in white.
CO 149 stitches in white
Row 1: knit
Row 2: knit
Row 3: purl
Row 4: K2 *k2 yo K4 K2tog K2tog K4 yo K1 yo K4 k2tog k2tog k4 yo k2* x5 K2
Row 5: knit first four stitches in white, continue in blue without cutting white yarn. You will draw this piece of yarn up with you every time you come across it. This way, you end up finishing (sewing) up a lot less in the end. When you get to the end of the row, using a separate skein of white yarn, knit the last four stitches.
Row 6: K2 in white, P2 in white, P2 the rest in blue until the last four stitches, P2 in white, K2 in white
Row 7:K2 in white, K2 in blue *k2 yo K4 K2tog K2tog K4 yo K1 yo K4 k2tog k2tog k4 yo k2 in blue* x5 K2 in white (also knit the last 2 of sequence in white, so your last four stitches are white) From this point on, I'm not going to go into detail as above, but follow the same principles with the border. When I say "in [color]," I'm referring to the body of the blanket and am assuming you're knit the first and last four in white.
Using the existing white skein on the side you are on:
Row 8: knit
Row 9: knit
Row 10: purl
Row 11: In white, K2 *k2 yo K4 K2tog K2tog K4 yo K1 yo K4 k2tog k2tog k4 yo k2* x5 K2
Yellow:
Row 12: knit
Row 13: purl
Row 14: K2 *k2 yo K4 K2tog K2tog K4 yo K1 yo K4 k2tog k2tog k4 yo k2* x5 K2
White:
Row 15: knit
Row 16: knit
Row 17: purl
Row 18: K2 *k2 yo K4 K2tog K2tog K4 yo K1 yo K4 k2tog k2tog k4 yo k2* x5 K2
Red:
Row 19: knit
Row 20: purl Row 21: K2 *k2 yo K4 K2tog K2tog K4 yo K1 yo K4 k2tog k2tog k4 yo k2* x5 K2
Repeat four times or to desired length.
To end-
White:
knit row
knit row
purl row K2 *k2 yo K4 K2tog K2tog K4 yo K1 yo K4 k2tog k2tog k4 yo k2* x5 K2
Blue:
knit row
purl row
K2 *k2 yo K4 K2tog K2tog K4 yo K1 yo K4 k2tog k2tog k4 yo k2* x5 K2
White:
knit row
knit row
purl row
K2 *k2 yo K4 K2tog K2tog K4 yo K1 yo K4 k2tog k2tog k4 yo k2* x5 K2
Knit row
BO
Labels:
Baby Room,
Finished Objects,
Knitting
Saturday, September 24, 2011
Shedding a Little Light
I'm now starting to resign myself to the fact that our renovation might not be done by the time baby comes around, especially if he's even a little bit early. But that hasn't stopped me from starting (and actually finishing!) some little projects. Finishing some, that is. I made this little night light in a day. Once again, it was inspired by B is for Baby, although I didn't follow any exact project - this is a combination of Suzanne Stirling's fabric wrapped full-sized shade and the ribbon night light.
You'll need:
A night light kit - I got mine from Factory Direct Craft - ridiculously fast shipping
8 (or so) strips of coordinating fabric
Rotary cutter
Self-healing mat
Coordinating bias tape
Yes! paste
Brush to apply glue
- Don't take the night light shade out
of the package until you're ready to start the project. Detach the light from the shade and dust off the shade completely. In fact, keep dusting it throughout the project. - Cut strips straight to start using a rotary cutter on top of a self-healing mat, making the length a little long on the bottom. You can eyeball both the length and the width if you want the lamp to look homemade and not super-perfect. Otherwise, you'll have to do some math by dividing the width of the fattest part of the shade by however many strips you have. Obviously, all the strips will be about the same length. The one or two strips in the middle will be the most triangle shaped.
- Using Yes! paste, glue the middle strips down first and work your way out. Whatever you choose to do, perfectly measured or not, cut the excess bottom part off with small scissors. The sides don't have to look perfect because you're covering them up with bias tape.
- Measure how much bias tape you need for each side by holding the tape to the outside of the shade so that half is hanging off. Apply glue to one edge at a time, and press the tape down. Let the side dry, apply Yes! paste to the the edge and inside of the shade, and glue down the extra bias tape. Do this for all four sides, and voila! Customized baby night light.
Labels:
Baby Room
Monday, September 12, 2011
FINISH HIM.
Maybe crafting isn't as brutal as Mortal Kombat but the time it's taken to finish some of these crafting projects has been excruciating. But I see the light at the end of the tunnel for a couple things. All I have to do is finish my blanket by weaving in the ends. I'll post the pattern when I'm done. The ultrasound frame is almost finished - just need to get one final pic from my 35 week appointment which is next week. Yup...35 weeks. Bananas. I only have a couple pages of my scrapbook/baby book. And I have yet to purchase the actual book. I'm looking for some good templates for the written baby book-y pages. I want the thing all set up before the baby comes. I'm sure all craftiness will slow exponentially at that point...
Labels:
Baby Room
Saturday, September 3, 2011
U is for Ultrasound
My bestie got me a great baby craft book full of ideas. It's what made me decide to make my own mobile (even though I went a completely different route than the book suggestion, but still...). The book is B is for Baby by Suzanne Stirling.
Labels:
Baby Room
Tuesday, August 23, 2011
Cute Ways to Count
I've recently discovered Binth - the company makes beautiful modern prints for the home, and their baby stuff is gorgeous. I love their baby book, though I have no intention of buying it, as I'm crafting my own, scrapbook style. But still, you can get a sense of their style...
I love this numbers poster. It matches what I have in mind for my nursery perfectly.
I'd jump on it, however, I'm still toying with the idea of doing something with my embroidered table numbers. Not sure yet, though. What do you think?
I love this numbers poster. It matches what I have in mind for my nursery perfectly.
I'd jump on it, however, I'm still toying with the idea of doing something with my embroidered table numbers. Not sure yet, though. What do you think?
Labels:
Baby Room,
On the Walls
Saturday, August 20, 2011
Fun New Toys
I've been keeping myself busy with all
sorts of crafting projects, which has called for a bunch of new crafting toys. I bought this Martha Stewart circle cutter from Michael's the other day and have been using it to make my 3-D baby mobile. It's coming along super well, if I say so myself. I'm so glad I decided to invest in it instead of free-handing a bunch of circles with an X-acto. However, I couldn't completely avoid that because the mobile is sports themed and the circle cutter won't cut smaller than 4 inch circles - not good for golf balls. Anyway, check out my work so far here. And by the way, you should all invest in the Michael's iphone app. Actually, no investing necessary- it's free! And you'll always have a 40% off coupon and they scan it right off your phone. Genius. Anyway, see how cruddy the free-hand gold balls look compared to the rest?
I used the paper from which I cut the basketball to guide the lines.
I didn't want to obsess over making the perfect soccer ball, so I purposefully made them cool and abstract-looking. I think they came out rather well.
More details about the mobile to come when it's done!
I used the paper from which I cut the basketball to guide the lines.
I didn't want to obsess over making the perfect soccer ball, so I purposefully made them cool and abstract-looking. I think they came out rather well.
More details about the mobile to come when it's done!
Labels:
Baby Room
Friday, August 19, 2011
Back to Class
I began this blog (it's been almost three years!) when I "started sewing". It is more appropriate to say I started this blog when my friend gave me her old sewing machine and I intended to start sewing. I've only made a few things, many of which are seem too small and simple to post here. When I was home, one of my main missions was to get a sewing lesson or two from my mom. I needed her to help me with curtains for the nursery. I had a great time going to the fabric store (Thimble Pleasures in Chapel Hill - love that place) and helping (it was more like watching) her put the valence together. I didn't do much of the sewing but it was nice to be a part of the process. We also picked up some finials fro Pottery Barn kids to compliment the aqua fabric with yellow tabs.
I'll reveal the entire nursery all at once, but here's a little peek. Excuse the crap picture - I haven't been able to find my camera charger post-move.
Labels:
Baby Room
Michigan Baby
B went to U of Michigan and he likes to make sure the whole world knows it. I got him (and the baby, of course) this print for the nursery from Area Fare on Etsy. I used a white frame that will match the white + primary colored nursery I am envisioning in my head. I've started a ton of craft projects (ton = 5 or so) to keep me occupied. It's my version of nesting. I've resorted to heavy crafting since I technically don't even live in my house yet...
Labels:
Baby Room,
On the Walls
Subscribe to:
Posts (Atom)